How to redirect HTTP to HTTPS using .htaccess
Sometimes you are getting insure warning on your website when you using Chrome or Firefox browser without SSL Certificate. Without SSL your website is showing insure message to your visitor. This is very important for your website. If you have any website like e-commerce or anything where there is some online payment section then you must have to install SSL Certificate on your website to redirect HTTP to HTTPS. Therefore, using an SSL encrypted connection on your website for safety, accessibility or PCI compliance reasons is necessary.
Storyline:
Generally, after installing the SSL Certificate on your website, it will automatically redirect to HTTPS connection like https://yourdomain.com/. But many times HTTPS is not working on your website although the SSL certificate is installed. So you can force it to redirect HTTP to HTTPS connection on your website using some rules in .htaccess file.
What is SSL?
SSL stands for (Secure Sockets Layer). Actually it is a security authentication protocol that is establishing an encrypted secure connection between your web server and browser in online communication. This technology is using for encrypted sensitive data across the web.
In order to redirect to your web traffic to use HTTPS, you have to edit the codes in the .htaccess file or create .htaccess file if there is no .htaccess file in your web server.
Before we move on to redirect HTTP to HTTPS, here is the process of how you can edit the .htaccess file. If you already know about this then you can skip this edit .htaccess process,
How to Edit .htaccess File
The .htaccess file is located in the root directory of your website. The period (.) in front of the file name (.htaccess) means it’s a hidden file and you won’t be able to see it when browsing your files unless you show all hidden files on your webserver.
You can edit the .htaccess file using the following ways:
- Make sure to back up your site before editing the .htaccess file. Coz some single syntax error of .htaccess file will break your site.
- Create or edit .htaccess file from your computer and upload it to your website using FTP or Cpanel
- You can edit it using FTP edit mode directly.
- You can also use SSH against FTP to edit the .htaccess file.
- Login to Cpanel and go File Manager to access this .htaccess file.
Using cPanel File Manager
- Login to cPanel
- Go File Manager in the Files section
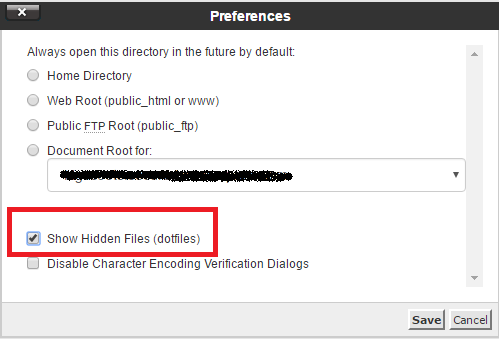
- Click the Settings button from the top right corner of cPanel and select Document Root for: as the domain name you wish to access.
- Make sure that Show Hidden Files (dotfiles) checkbox is checked otherwise, you won’t see it.
- Then click Save.
- Find the .htaccess file in the list of files.
- Right-click on the file and edit on the menu.
- A dialogue box may appear asking you about encoding. Just click on the “Edit” button to continue.
- The editor will open in a new window.
- Then you can edit as you need.
- Click save changes from the top right corner when done.
- After the changes have saved you have to test your website to make sure that it has the desired effect. If not then correct the error and test it again.
- Once everything is working well with your requirement on your website then click Close to close the window.


Redirecting HTTP to HTTPS (Secure connection)
Dynamically redirect to your host with https for all traffic
|
1 2 3 4 |
RewriteEngine On RewriteCond %{HTTPS} off RewriteRule ^(.*)$ https://%{HTTP_HOST}%{REQUEST_URI} [L,R=301] |
Redirecting to the specific domain
|
1 2 3 4 5 |
RewriteEngine On RewriteCond %{HTTP_HOST} ^yourdomain\.com [NC] RewriteCond %{HTTPS} off RewriteRule ^(.*)$ https://www.yourdomain1.com/$1 [R,L] |
Note: If the first line “RewriteEngine On” is already in your existing .htaccess file then no need to add it twice. This line is not related to the rest of the lines. Definitely, its a dependency to RewriteEngine On rule but for redirecting https code is only the rest of the code.
Another thing is if your website is in a subfolder or subdomain, then you should be placed that .htaccess file in the corresponding subfolder or subdomain folder.

That’s great. It works for me